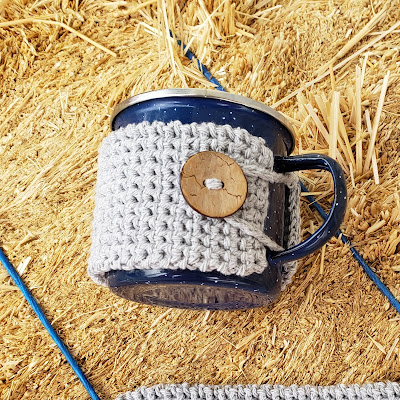
Nearly everyone I know uses the little metal cups that come with most camp plate and dishware sets when they go camping. They are great, light-weight, and easy to transport. However, since they are metal, they get finger-burning hot! I recently learned the thermal stitch, and figured it would be perfect to protect fingers while having coffee while camping. I made two sizes, small for the little cups, and then large for a more standard size mug.
This pattern is super easy to make, and fairly yarn efficient with the size for the little one, I got *nearly* three perfect ones from one skein of re-up yarn from Lionbrand Yarn. I had to shorten the 3rd by two rows to complete it, but still, that’s pretty good yarn use.
Materials:
- 1 Skein-Re-up Yarn, or other worsted weight cotton yarn
- 5.00 or 5.50 mm hook, depending on size you are making
- 1 inch diameter buttons, I personally like to use wood buttons, but that’s just my style
- Scissors
- Sewing needle to sew in ends and sew on button
Notes
- There is no specific gauge for this project, just final measurements. Measurements do not include loop to go around button.
- This is worked in the thermal stitch, search you-tube for thermal stitch how to videos, I will provide the best written explanation that I can. Short-how-to photos included at end of pattern
Pattern
For Small– with H (5.0 mm) hook
Start with a chain of 11
Row 1– sc in the second chain from the hook and in each across, Ch 1, and turn. (10 sc)
I recommend doing this starting chain, in the back loops of the chain so you end up with a nice start and finish.
Row 2– sc in back loops only, in each stitch across, ch 1 and turn (10 bl sc).
Row 3– This is the first row of the thermal stitch, you are going to insert your hook through the back loops of row 2 and the open loops from row one and sc like normal. This will give you the double thick thermal stitch. Sc this way in each stitch across, ch 1 and turn. (10 stitches)
Row 4– 64-Thermal stitch across each stitch ch 1, and turn. (10 stitches).
Row 65- insert hook as though you were going to do another row of thermal stitches, but slip stitch across the row. It evens out the steps between rows.
At end of row, Ch 20 and slip stitch to other corner to create the loop for the button.
Sew button on in the center and 5 rows up on the right side.
For Large-with I (5.5 mm) hook
Start with a chain of 12
Row 1- sc in second chain from hook, and in each stitch across, ch 1 and turn. (11 sc)
I recommend doing this starting chain, in the back loops of the chain so you end up with a nice start and finish.
Row 2-sc in back loos only, in each stitch across, ch 1 and turn. (11 bl sc)
Row 3-This is the first row of the thermal stitch, you are going to insert
your hook through the back loops of row 2 and the open loops from row
one and sc like normal. This will give you the double thick thermal
stitch. Sc this way in each stitch across, ch 1 and turn. (11 stitches)
Row-4-79- thermal stitch across each stitch, ch 1, and turn;
Row 80- insert as though doing the thermal stitch but slip stitch across each stitch to even out.
Chain 20 and slip stitch to other corner to create loop for the button
Sew button on in the center stitch and 5 rows up on button side.
How to Thermal Stitch
This is a shortened sample of the pattern for the small size.
|
|||||||||||||||||
|
|
|||||||||||||||||
| If you make this pattern please tag me, @tinyfarmcrafts and #tinyfarmcrafts. I’ll share on my instagram! | |||||||||||||||||


